Sunday, 21 April 2013

New Goodies

I'm enjoying a proper lazy Sunday in bed doing very little and eating food that I shouldn't be.
In the meantime, on Friday I finished my first year at Uni, which is completely UNREAL. Seems like a second ago that I arrived and now I have 4 and a half months off to play with. Don't quite know what to do with myself!

To celebrate finishing, I decided to spoil myself with a few new make up bits. Here's what I came home with:
My usual favourite treat is anything MAC, as I've mentioned many a time. I've got a massive collection of lipsticks, but I've been after this one for ages. The shade is called Impassioned and it's an amplified lippy, which is one of my favourite finishes because it doesn't dry the lips out. The lipstick cost me £14 but I think it's worth it.

I also decided I needed to invest in a purple nail varnish, as I'd left my favourite Leighton Denny one at home. This one is called Dark Angel and it has a cream finish to it. I loveee the colour on! I don't like to wear black nail varnish, so a dark purple is a great substitute for me.

My final purchase was this NARS blusher. I've heard great things about NARS make up but I've never actually bought anything from there before. I saw this shade of blusher on a make up artist's instagram and fell in love with it. The colour is called Mata Hari and I think it's beautiful on. You only need a tiny bit to go a long way, so I'm sure this will last me ages. I love the way that there's a mirror built in to incase I need to fix up on the go.

After my exam on Friday, my flatmate's friends came to visit and we all went on a night out. I decided to take a few pictures of how my make up ended up. I used all of my new bits from earlier that day as well.
My eyes were the first thing to be done. Here I put MAC Ricepaper eyeshadow on the lid and in the inner corner before buffing Amber Lights into the outer corner. I used Casino in the centre of the lid and blended that together with Amber Lights. I also put Amber Lights under the lower lashline. I then used a small amount of the Constructivist paint pot on the crease and buffed Mulch shadow into it. I also used Hush Cream Colour Base as a highlight under the brows. I put on a thin line of Blacktrack on my upper lashline and waterline before adding lashes. The ones I'm wearing are the Millie Mackintosh lashes in Shoreditch but brand new ones.  I didn't want to go too out there with my eye make up because Impassioned is a fairly bright lipstick, so didn't want to take too much away from it.
Here is Mata Hari on the cheek. The colour is beaaauuuutiful, I'm in love with it! I used it along with my Extra Dimension Powder in Superb to contour and Hush again to highlight.
 
This is the finished look from the evening and I found that all of my make up managed to stay on really well, especially my eye make up. A good night was had by all.

Wednesday, 17 April 2013

Casino Eye Shadow Make Up Look

Sorry this has taken so long! I'm back at uni now and have so much to do but just couldn't wait any longer!
I was a bit lazy with this look I have to admit, seeing as it's currently 1am here now and I'm just off to bed. I thought I'd do it before I took my make up from the day off, so my brows and foundation were already done and I had a bit of mascara on. I'm thinking I might get one of the uni girls to be a model for me next time and go from scratch.
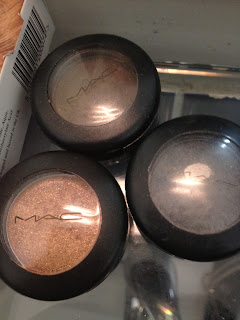
So here's what I'm working with. On the bottom on the left hand side is Casino, the shadow I bought from eBay that I talked about in my previous post. At the top is Brun, a satin brown which is perfect for a smokey look but if you aren't brave enough to go with a black. Finally we have Knight Divine on the right hand side. I got that shadow for my 16th birthday and it was the first MAC shadow I ever bought. Almost 5 years later and it's only just getting to the bottom of the pan!

Here are the tools I'll be using. This picture just makes me realise my brushes need a good clean, whoops! My favourite brush is the 213 because it can be used to deposit colour but you can start to blend as well before finishing off with the 224. The 213 I recently bought off eBay. Pretty sure that's not a real MAC brush but it doesn't bother me really. That's great for smoking out lower lashlines.
I used to use MAC lashes (typical) all the time, but recently I have a new favourite. Everyone's favourite Made In Chelsea girl Millie Mackintosh has launched her own lash line and I LOVE them. Here's a brand new pack I bought recently from nouveaubeautygroup.com but I believe you can get them in Selfridges now amongst other stockists. At £8.99, they aren't massively cheap, but less expensive than MAC at least. I love the Shoreditch lashes especially, which I'll be using in the look today. I'm saving these brand new ones for a special occasion so I'll be using my old ones, which are fine just a little bit well used.

Okay, so being lazy, I already had most of my make up on which just needed touching up. I used my MAC Studio Fix Fluid in NW25 (because I have tan on) all over my face, concentrating on covering any bags under my eyes. I filled in my brows with my Stud brow pencil and added a bit of bronzer as well. I put on mascara, which was Loreal Mega Volume Collagene 24 Hour in Extra Black, definitely a trusty mascara.

To start my eyes, I put MAC Prep +  Prime Vibrancy Eye all over the lid up to the brow. It's important to use primer before putting on eyeshadow so that it doesn't crease and you end up with that horrible line across your lid.
Next, I put Casino on my 213 brush and popped it all over my lid and right into the inner corner of my eye. I then blended it out using the 224 brush so that it filled the lid up to the crease. Blending is great because it stops shadow from looking too harsh and removes any obvious lines from using brushes. I also put Casino under my lower lashline using the 214 brush.
To follow that, I used Brun, again on the 213 brush, in the outer corner of the crease, blending it out with the 224 towards the inner corner. I also used the 214 brush to put Brun under the outer corner of the lower lashline, stopping about 3/4 of the way in.
This is what this looked like so far. I probably should've taken a picture with my eyes shut but oh well.
 Next, I used Knight Divine, but on the 239 eye shader brush, as I find this is easier to control the area you want to put shadow on over the 213. People use all of the brushes in different ways, there are no set brushes for set things, but that's the way I prefer to do it. I used Knight Divine in the outer corner of the crease then blended it outwards and upwards as well as along the crease into the Brun.
I took the Brun again but on the blending brush and just swept it once across the brow bone just to make sure that the grey didn't look too harsh.
I followed this by using my Hush Cream Colour Base to highlight my brows and to soften any harsh lines near the brow bone. I then cleaned up along the outer corner using concealer.
Using the 210 liner brush, I applied Fluidline Liner in Blacktrack along the upper lashline. I didn't flick it out or anything because I think if the eye is quite dark you don't really need it. I then did the same on the waterline.
Here is the finished look minus lashes:

On my lips I used my faaaaavourite lipstick of all time, Snob. It's bright, but wearable during the day and I don't like using reds when I've used greys or blacks on the eye. Therefore, Snob is perfect, as it's a lovely blue-toned pink.
 
Here's how it looked after the lashes were applied. I used Duo Adhesive glue and tweezers to put the lashes on for anyone wondering.

And the grand finale...
The finished look with the lashes makes the look that more dramatic. I think the use of grey rather than a black like Carbon also adds to the smoky effect I was trying to achieve. I also think that Casino acts as a brightener to the eye in the inner corner while showing the 'fading out' on the lid.
 
I hope you enjoyed the look. Maybe I'll do my step-by-step when I get ready to go out on Friday night. I think a red Ruby Woo lip might be putting in an appearance...

Sunday, 7 April 2013

MAC Casino Eyeshadow

So my eyeshadow arrived from eBay which I'm so pleased about.
It was just something that caught my eye when I was having a browse and looking for it on the MAC site shows that it's nowhere to be found. It's a rare find so I'm counting myself lucky. It arrived on Friday all boxed and unused, perfect.


When I took the shadow out of the box I realised that Casino was very similar in colour to another eyeshadow that I had. Thinking I might have been duped, I had a check and it is a real shade, I tested them against each other. As you can see below, Casino looks pretty similar to another MAC shadow, Amber Lights. The colour is ever so slightly different, with Amber Lights coming off as more orangey and Casino looking more gold. The shadow's finish as well is also different, with Casino having a lustre finish and Amber Lights a frost. Casino also appears to have a more glittery pigment to it.
Top: Casino, bottom: Amber Lights.

Swatched, left: Casino, right: Amber Lights.
Similar as the two shades appear, I think they would look great on the eye blended together with perhaps a matte brown or a copper. They're both very shimmery as well, so perfect for a smokey eye or make up for a night out.

Casino itself is quite a variable shade to wear. I think it could be worn solo during the day with a dramatic lip, so it's not just a colour for parties and going out. Here I've put it on my lid with no other make up. No mascara, no liner, just the shadow, with a tiny bit of concealer and brow pencil.

 
 Excuse the awful bags, I was having a make up free day! However, you can see that although the colour is a shimmery gold, it isn't too overdramatic. I think the colour brings out the green in my eyes too and I think it would be perfect for people with brown eyes.
The wash of colour on the lid isn't too overpowering like some gold colours can be, yet it is a definite gold whereas some are too muted. I imagine this blending well with browns, blacks and greys for a smoked-out look, or being used along with a very light powdery lilac to create definition. Apart from on the eyes, it could also be a highlight for the cheekbones or even down the centre of your nose.

Apart from it's similarities to Amber Lights, I think Casino is a very versatile and blendable colour with a nice finish to it. It has a slight glitter pigment, but it isn't too dramatic and still makes it wearable during the day. I can't wait to use it in some of the eye make up I come up with. I've bought myself a new small shading brush, so perhaps my next post will be an eye make up look using that brush.

Wednesday, 3 April 2013

Threading

I noticed the other day that my brows are in dire need of a bit of TLC.
One thing that I cannot stand above and beyond anything else is unkept brows. They actually make me feel borderline unhygenic. I always make a point of keeping on top of my brows but recently, with all the uni work I've had to keep on top of, I've let it slip.

However, my ultimate top number one hint-above-all-hints for brows is to get them threaded. Sure, waxing and tweezing and plucking and all that malarky is good but I just find that threading is so much more clean and maintains my shape well. It's pretty inexpensive too. It costs me a tenner to get my brows threaded at a place in The Traingle in Manchester but there are plenty of places around that offer it for cheaper. Superdrug stores across the UK have instore threading bars these days where I'm sure it costs no more than £7 or £8 to have them done. I've noticed that there are loads of YouTube tutorials about too, so you can even give it a go yourself if you're feeling brave.

Now, I apologise profusely for this, but here is my one of my eyebrows from this morning (complete with a rather bad pencil work, I was rushing!).
You can clearly see below the tail end of my brow, there are a hell of a lot of stray hairs which need tidying up asap. Whenever I've had my brows threaded previously, I've been told off for plucking away strays and unintentionally ruining the shape. Therefore this time I kept away from them, difficult as it was.

Threading has been used for years to remove unwanted hair, especially in Eastern countries. The idea has only recently reached the West and I can't help but be glad that it has! Infinitely better than tweezing, which only removes hairs one at a time, with threading you can pull out whole rows of hair straight from the root. You can really feel it working too, as the thread is rolled along you can definitely feel each hair coming out. You can actually also have your top lip threaded (which hurts SO much but still) and I'm pretty convinced I've also seen neck and even face threading being offered in some places.

I would recommend threading even for people who find taking care of there brows to be painful. It can be slightly eye-watering at times if there are thicker hairs, but I found that the pain is almost like a good-pain. I'd say it is almost similar to that of epilating your legs but on a smaller scale, possibly even less painful than that. Another lady having her brows threaded at the same time as me said that she always has her brows threaded because she has sensitive skin, so possibly threading is the way forward for you if you have this issue.

Although you leave the shop with slightly red brows, they soon calm down and leave you with clean, shaped brows. Here's what mine looked like after the redness had gone, no pencil or wax or anything else on.
I love how much more defined the shape of my natural brow looks and I can see more clearly where the sparser areas are to fill them in. I find that the more often I have my brows done, the less pencil I need to put on them, which I guess in the long run can save you money!

Loving the new brows and feeling, well, cleaner and tidier. To come, hopefully this week, I've bought a new MAC shadow off eBay. It's called Casino and is apparently a rare colour, so ooh-er to that! I can't wait to play with it. The second it arrives I'll be on here reviewing it and maybe following it up with how I would use it. People will finally get to see me showcase, if that's how it's put, my artistry, so very excited for that.

Monday, 1 April 2013

MAC Strobe Cream

To begin with...

I picked up a little something when I went shopping at the Trafford Centre today, as it's something I've been dying to have a go of for ages. Now that my student loan is in (THANK GOD) I can treat myself a little bit. So I bought myself a MAC Strobe Cream.
At £22.50 for a 50ml tube, it isn't exactly cheap, but I felt like the expense could be excused because of my love for all things MAC. I mean, look at it! Look how pretty it is! I love the bottle and the clean lines always used by MAC packaging with that big chunky lid.
Usually, my moisturiser of choice is Liz Earle Skin Repair Light Moisturiser (50ml tube, £19.25), because it's really good for my oily skin and doesn't feel too heavy. Because I love my Liz Earle, I have to say I was a bit apprehensive trying out Strobe, as I didn't know exactly how it would sit with my teenage spot-prone skin.

The first thing I love about this moisturiser is the formula, which is a work of art in itself. It is a fairly thick creamy liquid, but the best part is, it has this almost iridescent shimmer to it. I don't even know how to describe it, you can see for yourselves in the pictures, but I think it looks gorgeous.
MAC describe Strobe on their site as: "The ultimate quick fix for the skin... Brightens and clarifies with iridescent particles and antioxidants. Enhances the effects of light on all skin and in all lighting conditions from sunlight to spotlight."
 
I used a very small amount of the Strobe cream and a very little definitely went a long way. I didn't need to reapply any of the cream, as immediately I could feel a difference with my skin. The smell is amazing! That typical clean MAC smell that comes with all of it's skin regeime. My skin felt plumper and I felt like my complexion definitely looked brighter.
Within minutes my skin, especially on my cheeks, felt softer. I didn't feel like the formula was heavy or greasy on my face, which is the ultimate no-no for someone who has oily skin such as myself. MAC were right, Strobe certainly gave my skin a quick fix.
 
I think from here on in, I will be mixing between my Liz Earle and Strobe, because I love both products so much. I would completely recommend the Strobe cream for anyone who is after a new moisturiser which is lightweight and yet has a great effect on the skin. I would say the only issue I had with the cream is the price, which is a bit of a luxury. However, when you only need a small amount to completely rehydrate your skin, it is worth the cost.

First post!

Hello!

My first ever blog post it would appear! Bare with me as I'm just getting started and I'm new to the whole blog world. I'm so excited to be starting my blog, which as you might guess will be based around make-up and other beauty products. I hope that you'll enjoy reading about everything I've been checking out and will keep coming back for more.

To begin with, a bit about me:
 I'm 20 years old and from Manchester, but usually you can find me in Liverpool studying Journalism at LJMU. I've started this blog simply because I am a HUGE make-up junkie. I love everything and anything MAC, although I won't just use their products to blog with! I think that I'd like to become a make-up or beauty specialist for a magazine, that's definitely the dream. Another passion of mine is film, so I might throw in a few things about that here and there if they're relevant.

Thankyou for reading and I hope you enjoy the blog!