Sunday, 22 December 2013

Bold Lips and Sparkly Eyes

I can't sleep at the moment because I'm just getting so giddy for Christmas so thought I may as well blog.

In terms of looks for Christmas time I think it's all about a bit of glitter and sparkle. I've dug out my old glitters loose pigments from one of the old MAC holiday sets, think it was 2011, and can't wait to use those.

First off, I got this gorgeous gift off one of my best friends for Christmas and as we weren't feeling really Christmassy yet we decided we could open them. I've been after this little pot of beauty for ages and that is the MAC pigment in Blue Brown. I can't even describe how amazing the colour is and a great alternative to any normal black or brown. Here I used it pressed all over my lid on top of Constructivist paint pot and with Shadowy Lady in the crease. It's such an easy colour to incorporate into any eye look and the pigment is so so pretty. I'm in love!

As you can see the two tone colour of the blue makes the eye pop. I absolutely adore this pigment and it's so easy to use. For an even more dramatic effect try spritzing Fix+ spray on before hand to make it a wet application.

I have always been a fan of a pop of colour on the lips especially with a toned down muted eye. Purple is a definite alternative to a traditional red for Christmas and I will be rocking it for certain.

Have you heard the fab news that MAC are bringing back Heroine from the fashion sets this year for good? A great move in my eyes as I am a big fan. Here I'm wearing Heroine on the lip lined with Currant and Snob in the centre. It created a sort of ombré look to the lip but you can't see it so well because of my camera.

If you're feeling mega brave, try adding black to the outer corners of your lips. Be sure to blend it in properly and don't go to mad though cos otherwise you may look a bit crazy!

Those are a couple of my looks for Christmas. More to come on the lead up to Santa's visit!

Monday, 16 December 2013

Christmas Meal

Me and my girls from home went out for our Christmas meal to Spinningfields in Manchester last night. We ended up going to this really nice place called Artisan, I'd definitely recommend it. 

For a meal out I wanted to go with a casual but classy outfit and then have my make up be more of the focus. I decided to go with a soft smokey eye rather than a full one and contour my face properly. This is how things ended up.

As you can see my eyes are dark but not completely smoked out. I finished with a pink lip which I thought made the look pop a bit.

I primed my eyes with Urban Decay Primer Potion in Eden, which leaves a clean skin-coloured base to work with. I love this product and it's consistent isn't too drying. I then used by Urban Decay Vice 2 palette and applied a wash of Habit up to my brow bone. In then applied Toxic all over my lid, using Dope in the inner corner and under half of my lower lash line. I used X-Rated in my crease as a transition colour. I loved doing a smokey look with pinks for once, it's nice to do something a bit different because sometimes browns or blacks are a bit same old.

After this I went to my Urban Decay Naked 2 palette. This palette is still one of my favourites and has all the colours you need for a natural eye. I used Chopper on the outside half of my lid and blended it with the Toxic from before. I then blended Busted into my outer v.

From here I used a MAC shadow called Amber Lights on my lower lash line and the centre of my lid. I blended a small amount of Carbon also by MAC into my outer v and lower lash line. I lined the top of my eye with MAC Blacktrack fluid line and my waterline with NYX jumbo pencil in Milk. The lashes I've used are eldora H105 and they're gorgeous long length lashes but not too full, so you get volume that looks natural. I used my MAC False Lashes mascara to complete the eye.

On my skin I contoured my whole face with my sleek palette and bronzed with MAC Mineralise Skinfinish in Medium Deep. For my blush I used MAC Warm Soul which is a mineralise blush and perfect for a natural glowy finish. On my brows I used Dipdown fluid line by MAC as well as a MAC shadow in Brun to set.

I lined my lips with NYX pencil in Bloom,  a dupe of MAC's Magenta but I prefer the finish of this pencil. I then used MAC Snob lipstick all over my lips and finish with Long Love Love Pro Longwear gloss. I went back in with my NYX pencil in the corners of my lips to deepen the colour.

So there you have it, my simple make up look for the Christmas season. Sometimes at this time of year less is more but I can't wait to do a bit of experimenting over this holiday. I've dug out some of my MAC glitters from the Christmas collection 2 years ago so can't wait to be reusing them!

Sunday, 1 December 2013

NYX, Sleek and MAC Goodies

Haven't posted for so long it's ridiculous! Definitely need to keep up with this and I know I say it all the time but over Christmas I'm going to get the ball rolling again.

As I haven't posted in a while I thought I'd do one about my new bits and pieces that I've been using recently. I've been branching out a bit and trying some new products that I've heard of through artists, mainly on Instagram.

This is my most recent set of purchases that I've made over the last 6 weeks or so.


Here we have products by my favourite MAC, as well as NYX and Sleek.

Starting off with the NYX bits. I've heard so many good things about this brand but as at the moment it's only available in the US it can be hard to get hold of things. Luckily I hear that it's coming to the UK and Next are going to be stocking it. I however got my bits off eBay.

From NYX I bought a lipstick and the colour is Hestia. It's a deep oxblood red and it's gorgeous for Christmas. The colour is very rich and it does stay on for ages. My only issue with it really is that it can bleed quite easily without liner and it does stain your lips and can be hard to get off! However I love love love the colour and would buy another NYX lippie.

My other NYX purchase was a jumbo eye pencil in the shade milk. This is a white chunky eye pencil with a quite a waxy consistency but don't be put off by that cos it's fab. It's so easy to use and doesn't budge, making it perfect to use as a primer. The consistency helps here too because shadows, especially loose or pigmented ones, will stick to it easily. It's so multi-useful as I also use it as a brow highlight and on my waterline to make my eyes pop. As you can see I've already used it a lot!

Moving on to my Sleek, I purchased a Correct and Concealer Palette. I've been after one of these for ages as I love using concealer to get the perfect contour. I got shade 4 as I wanted one of the concealers to be quite dark. I love how the set also comes with a powder to get rid of any excess shine. I don't think I'd use this as my go-to concealer though as this one is quite a lot lighter in terms of coverage compared to MACs which is practically industrial! However, it is perfect to use it for highlighting and contouring your face and making it look natural.
Finally I have the MAC Pro Longwear Lipglass in the shade Long Love Love. As far as I'm aware this colour isn't available in the UK as I got mine from my favourite bargain place, eBay. The colour is beautiful. It's a blue based pink which makes your teeth look whiter supposedly. It also smells really nice which is always a plus. The gloss is quite slick when going on and it can be quite difficult to get the placement of colour right with the Pro Longwears I find. However keep blotting and dabbing and you can get it to look perfect. I find that it looks gorgeous on top of Snob lipstick.
Apologies for the lip pictures looking messy, I have no other make up on but want to show what these two lip products look like on!

In terms of what's coming up, it's getting closer to Christmas so I will try and post a few looks for the holidays. As well as that, I am on the look out for some MUA Lip Lacquers which I've heard great things about, so I'll try and get hold of a couple of them to review. I also have some more of my favourite Eldora lashes on their way to me so I can't wait to use those!

Monday, 7 October 2013

Urban Decay Vice 2 Palette

I'm doing this via mobile as for some stupid reason my lappy won't allow me to upload any pics onto my blog which for this post would be an absolute disaster. Please excuse the lack of formatting, I'm pretty new to the blogging app.

Anyway moving swiftly on, I have an exciting new purchase to share with you. I heard about this palette coming out and was SO excited by it as the previews I had seen made it look amazing. I fell in love as soon as I saw the Vice 2 Palette and saw it as an investment and bought it home.

The packaging of the palette is to die for, rocking the strong Urban Decay amethyst purple and a bold silver logo. I'm told that every palette is individual and no two cases are the same which is pretty cool.
Open it up and look inside and you are met with an array of gorgeous and brand new colours, making it essential to any UD collector. You can create any look with this, whether it be a bold colourful eye or a simple muted smokey affair.
I love every single one of the colours and every shade you could possibly need is there. My personal favourites are Shellshock, which is this amazing reflective bright silver colour, and Toxic, an orangey-pink shade with a shimmer.

I had to have a play straight away so I did three eye looks to try and test out as many colours as possible.

This is my first look. I wanted to go for a simple quick easy goldy brown eye. For this, I primed my eye with UD Eden eye primer and used Dope as a base all over the lid up to the brow bone. I then used Toxic on the lid, leaving a small amount of Dope visible on the inner corner. I added Ambush in the centre of the lid and blended this out into the Toxic. In the crease I used Radar and then smoked out with, you guessed it, Smokeout, and then used Smokeout again on the lower lash line. I lined my eyes with MAC Blacktrack gel liner and added Eldora H142 lashes and some MAC False Lashes mascara.

My second eye look was a complete contrast colour-wise to my first. I wanted to use the greens and blues in the palette together, as these are also the colours in my eyes so I thought it would compliment them.

I primed my eyes as before with UD Eden and then used Habit as my base colour. I blended Stash on top all over the lid. I used Poison on the outer corner and half of the lid, blending it right out to make a wing. I used Madness in the crease and Damaged and Strike in the inner corner. Smokeout was used on the lower lash line with Damaged and a tiny bit was also blended into the wing. I lined my eyes as before with Blacktrack and added Eldora H140 lashes, my absolute favourites. My brow highlight is MAC Retrospeck as well as again using False Lashes mascara.

love a good girly eye look so my last one is pinks and purples. I primed my eyes in the same way as before and highlighted my brow with Retrospeck by MAC. My base colour this time was Rewind which I blended into my crease. I the applied X-Rated all over the lid blending it in with Rewind. Coax was then used on 3/4 of the lid from the outer corned in. Betrayal was used in the crease and Voodoo along the upper and lower lash lines. Shellshock was used in the tear duct and inner corner. I lined my eyes and used MAC lashes although I have no idea which number because I bought them in Spain. I completed the eye with mascara.

Here is the two eyes together to compare the colours.
I am totally in love with this palette. I love the selection of colours and the way that the shadows blend so easily. It isn't cheap, but I would definitely say that it's worth the money. Consider it an investment!

Tuesday, 1 October 2013

Eldora Lashes

Getting back on it with this blog! Need to stop falling behind so badly, eek!

First off in terms of new updates, I have been lucky enough to find myself a prize winner recently. I entered a competition on Instagram to win a pair of Eldora fake lashes, a new brand which I discovered through Insta in the first place, and I was lucky enough to win a pair of their gorgeous eyelashes.

I've already made good use of them, as well as purchasing a few different pairs to try out. With my prize they sent me a cute little message along with a big sheet of all the selections. I've had a good look and there's soooo many to choose from so I'm very excited to get my hands on some more.

Here's the pic of my prize from the Eldora girls taken from my Insta. If you wanna follow me my name's solo92 :)

There are some simple ones for if you don't really like to have massive spider lashes and various lengths as well as shapes. You can also find some amazing extravagant pairs and coloured ones which would be perfect for Halloween or an arty look.

The lashes feel great on your eye, not heavy and overbearing like you can sometimes find. The glue that comes with them is really good quality as well so you have no problems sticking them on. I love the lightweight feel to them and how flexible the bands are.

I loved using the lashes so much I've already worn them several times and they don't lose their shape when you reuse them. Here are two separate pics of me wearing my H114 lashes, the ones I won via Insta. One of which was featured on Eldora's own Instagram account which was a really proud moment for me.


If you're after a new pair of lashes I would definitely recommend Eldora to anybody. For more information or to order yourself a few pairs go to Eldora UK and click on their online shop. I can guarantee that you won't be disappointed.

Saturday, 20 July 2013

Product Update

Okay so I keep leaving it ages before posting new things, arghhh!

Won't let this happen again so major update today coming up. Not been out or done a look for ages so when I next do there'll be a post for that. Until then I thought I'd update you on a few of my new buys and the products I've been using. So let's crack straight on.

This is my BABY. I am so in love with my Fix+ spray that it's unreal. My mum bought it back for me from the airport and I owe her for it because it's such a life saver, especially with it being so hot in the UK at the moment. I spritz it over my face after I've finished my make up and it does an amazing job of holding it in place. Even after a longggg 11 hour day at work I leave with the vast majority of my make up perfectly intact. It's dead refreshing as well on your face and packed full of minerals to keep your skin looking gorgeous. One of my favourite products at the moment for sure.

After seeing a make up post on Instagram where the artist used a Prep + Prime Highlighter pen, I had to give it a try out. I got this from eBay for about £8, which I'm sure is good value but I don't think the RRP is too much higher. This shade is Bright Forecast and I've swatched it below so you can see the colour better.

As you can see the colour is fairly yellowy so I'd probably recommend this more for someone with and NW skin tone so that it blends in better. At first, I really wasn't sure about the colour of this as it is a lot darker than my natural skintone. However, when I'd put foundation on you couldn't even tell that this was an issue because it blends right in. I put this under my eyes and on top of my cheekbones and find it gives a really nice dewy finish to the skin, as well as making dark circles under my eyes less prominent. A great product to use, think I might try another shade soon though to see if that fits my skintone better.


I love a good lipliner and so I've been expanding my collection. I now have three staples, a purple, red and natural colour. Dervish is one I use for every day or when I'm using a pink lipstick. Liners are fab because they stop your lippie from ending up all over your face and also add dimension to your lips. Today I'm wearing just Dervish alone all over my lips with some lipgloss, so they are great to wear alone for a mega matte look or with a gloss over the top. I usually pair Currant with Rebel or Heroine lipstick and I think it's my favourite of the three, packed with colour. Redd is great to use with Ruby Woo or even a pinkier red like Impassioned. I'd thoroughly recommend using lip liner for anyone considering it, they're a massive help and there are lots of great colours out there.

Lastly, my FAVOURITE new toy which I have been waiting forever for! I'm so in love with my Naked 2 palette it's untrue. I'm a massive fan of a brown smokey eye as we all know and now I have just the kit to do it. I apologise for these photos being sideways, it's being annoying and won't allow me to rotate them, grrr. In comparison to Naked, the colours are a lot more neutral and wearable in my opinion. It's great for both an every day not too done up look as well as fab night looks and major smokey eyes.

 You have shades in the palettelike Foxy and Bootycall which act as great base colours and highlights. Tease is a fab matte brown which I love to use in the crease of my eye. Half Baked and Chopper are beautiful metallic tones to make any eye pop.
 
I love Snakebite, which is a shimmery brown and often use it in my outer v or under my lashline for a more subtle look. Verve is great for your inner corner as it is a subtle silver so brightens the eye. Pistol is my second favourite colour in the palette. A mid grey which is great if you want to try out dark eyes but don't like them to look too dark. YDK is a gorgeous sparkly bronze which looks great in summer and Suspect also makes a good base to start from for any eye look.

Finally we have Busted and Blackout. Busted is my absolute FAVEEEE colour in the palette, a gorgeous dark brown which goes great with any kind of eye make up look you're after. I use it often on it's own when I want some eye shadow on but don't want anything dramatic. Blackout is your standard matte black, a necessity in any make up fan's kit.

All of the colours in the palette are mega blendable and easy to use. You don't need a how to guide to use this kit it's that simple. Just have a play about with colours and more often than not, I find that an eye look comes together all by itself. The palette is THAT good! I also love that it comes with a double ended brush, both making application and blending easy peasy. I love this palette so much and would recommend it to anybody who can't afford to buy solo eyeshadows but wants a complete kit that's ready to go for any event you need. My palette came with a free Urban Decay mini lip gloss in Naked, which is a nice little treat and easy to wear gloss that looks great slicked over your favourite lippie.

Hope you enjoyed having a look at my new goodies. I'll have a look posted up soon no doubt with these products all being used. Now back to some last minute sunbathing for me while Manchester still has good weather!

Thursday, 20 June 2013

Evening Make-Up Look: Drinks with the Girls

Second post of the day, I know, I just couldn't resist!

Today I met up with two of my close girlfriends from school for drinks but I wanted to have nice make-up for the evening.

I decided to go for a classic look - winged liner with a bold lip. I chose to put a twist on this and went for purple lips instead of the traditional red.

I kepy my eye really simple. I have no eye make-up on my lid at all. All I've used is a Collection 2000 liquid liner to create flicks on my outer corners. I love my MAC make-up, but I'm starting to find that my fluidline is going a bit dry so I've gone for this as a temporary replacement. It does the job for less than a fiver anyway!

On the inner corner of my eye I've used my Natural Collection white eye pencil just to brighten up my eyes and focus the light on them a bit. In the crease I've used a tiny bit of Casino eyeshadow to give a bit of a glow. My lower lashline was lined on the waterline with the liquid liner and then lashings of mascara went on, Loreal Collagene is amazing.

Sincerest apologese for the pouting! On my face I used Superb Extra Dimension powder as a contour and used the light part of Shape the Future Extra Dimension powder to highlight.

My lip colour is Heroine my MAC. I LOVEEEEE this colour, it's so bold and bright! To give it a bit of extra oomph, I applied a small amount of Snob lipstick by MAC in the centre of my lips to make them look that bit bigger.

I hope you enjoyed my simple evening make-up look!

Coming up, I'm going away to Marbella with my girls so hopefully some summery holiday looks with lots of bronzer.

Black and Grey Smokey Eye: Going Out Make-Up

Saturday was my best friend Kat's birthday and I've had a dress ready for it for ages which is sort of black and grey tye-dye.

To go with this, I needed some serious make up. I normally do brown and bronze eyes with golds and decided with this I wanted something a bit different. I'd spotted a post on instagram that I'd fallen in love with which was a really black smokey eye with bright pink lips. Usually I disagree with bright lips with a lot of eye make up but this time I made an exception.

Here is the finished overall look, excuse my awful skin I had a breakout just before which was so inconvenient!
I began by priming my eyes. My new infallible secret weapon is Urban Decay primer potion in Eden. It is a creamy liquid that almost looks like a concealer in it's colour but it's fab. My eyeshadow didn't budge or crease, which is great because I can't stand bitty eyeshadow!

On my eyes I have several different eyeshadows, quite a few actually. From my MAC palette I used a clean white for under my brows, I think it was called White Rabbit but the name's rubbed off a bit. I also used this in the corner of my eyes along with a Natural Collection white eye pencil, which only cost me about £1.99.


I used my white glitter MAC pigment, which came as part of a stacker collection over Christmas, all over my lid. I used Browndown in my crease to try and soften it out a bit before adding Carbon all over my lid in a diagonal direction. The picture I'd seen had a really clean lower lashline, that was thick but then stopped before then using a white line on the edge. I used Carbon here and smoked it out with Knight Divine. I kept blending Carbon all over my lid and then added a bit in the corner on top unblended to make it extra dark. For a clean line on the edge, I used a wipe to take off any excess that had been blended too far over.

For my line, I used Blacktrack on both the bottom and top lashlines and flicked out both edges to give almost an Egyptian style liner look. I added some lashes and my eyes were ready to go.


On my face I tried to keep it minimal because the eyes and lips are so bold. Along with my usual foundation, I just used my MAC extra dimension powder in Superb to contour and extra dimension Shape the Future as a highlight. I also used a small amount of bronzer on my temples and jawline to slim my face down a bit, highlighting my chin and down the centre of my nose.

The lipstick I used is Silly by MAC which is perfect as it is bright but matte, so it isn't too distracting from the eyes by having any pigments in it.

I finished my look with my other new secret weapon, MAC Fix+ finishing spray. It is a miracle worker and helps to keep all of my make up on, even when I get warm under club lights. It smells amazing and fresh too.

Sorry there isn't a lot of description in this. I need to learn to blog the day after so I can remember what I did exactly!


Wednesday, 5 June 2013

Bank Holiday Night Out Make-Up

Sorry it's been a little while since I've posted, I've been so busy with this new job!

At the moment I'm working 5 days a week, not exactly what I signed up for when I took on a 24 hour contract, but at least today is a short day and I don't start until 4pm.

Anyway enough of the complaining. On the Sunday of the bank holiday weekend I went on a night out with two of my closest friends in Manchester, so this is the make-up I had on from that evening. It has been a little while since the actual day so I'm not too positive about what methods I use but can remember all the products.

So let's start with my eye make-up:


This eye was similar to the one in my other going out make-up post, except it uses more brown in the crease. All over the eye I used Ricepaper with Casino on the outer lid. I then used a combination of Mulch and Brun with a tiny bit of Carbon in the corner of the crease. I line my eyes with Blacktrack fluidline and smoked it out on my lower lashline using Carbon. The lashes I've used are Ardell 117s which I trimmed to fit my upper lashline. I also used a small amout of Amber lights on the lower lashline. For my brows, I shaped them using a brow comb before defining them using a Stud pencil and Brun in the inner corner.

On my face I used my strobe cream followed by some concealer and my Studio Fix foundation in NW25. I bronzed my temples and jawline using my Mineralise Skinfinish Powder in Medium Deep. On my cheekbones I used Skinfinish Extra Definition in Superb and highlighted using my Casino eyeshadow. I then used MAC Peachykeen Sheertone Blush on the apples of my cheeks.

My lips were lined with Dervish lip pencil and I then used the limited edition Force of Love lipstick which has a matte finish to it. Later on before I was going out, I added a tiny bit of Viva Glam Nicki 1 on top to give it a slight gloss.

So there we have it, my look for the Sunday night is complete. Sorry there isn't too much detail, hopefully my next make up look post will tell you a bit more.

Coming up, I have some MAC goodies to review which my mum bought me as a present when she went on holiday. As well as that, I have a new Urban Decay primer to play with and a couple of new shadows. I can't wait to use them in a few looks. Ta ta for now!

Monday, 20 May 2013

MAC Fashion Set Lipsticks: Heroine and Silly

I have never been so excited to receive a package in my life waiting for these!

If you are an avid MAC follower, you are probably aware that the fashion sets have sold out all over the place and are proving to be massively popular products. As soon as I saw them when they came out in the US I fell in love. I couldn't even decide which colour I like the most! So imagine my face when I went on the MAC UK site to find they'd all sold out too. However, using the magician that is eBay, I managed to get my hands on two of the lipsticks, Silly and Heroine. I'm not even going to say how much I paid for them because it even appalls me so I'll leave you to guess. However, if you are lucky to find one in a MAC store, they retail at £14.


Here we have Silly, which is a very bright almost neony pink. I love how bold the colour is, definitely a great way to be a bit braver if you're not quite up to trying anything to drastic. I usually really don't like matte lipsticks because I find them too drying on the lips, but Silly sits really well and doesn't flake. Even after a few hours in work with it on, I'd check up on it on my break and find that the colour had still stayed put even though I hadn't reapplied it since the morning. I think Silly is a great colour to wear anytime and it isn't too out there in comparison to the purple of Heroine. Everyone loves a good pink and Silly is definitely a pink I'll be using a lot.

Today I'm wearing Heroine, which I think has to be my favourite shade of lipstick EVER. I absolutely adore the colour! It's a much brighter purple than for example Rebel, but it's still so wearable. I have it on today with a tiny bit of MAC Snob lipstick in the centre of my bottom lip to make it slightly more day-wear. I think most people went mad for Heroine when they first saw it, as that seemed to be the shade that went first and I think I'm going to be joining them. Again, it's a matte lipstick, but like Silly I don't find it drying and the colour stays on for hours after application. I think that Heroine would look great with darker skintones too. I've seen it on a few people on instagram with darker skin and it looks phenomenal.

Not too sure what'll be coming up in the next few weeks. I'm hoping to maybe take a step away from MAC and see if I can find some dupes at a lower cost brand. Perhaps I'll do a look as well to pass a bit of time until I get some more money, as I'm so skint until pay day and have a holiday coming up! Keep looking out for me.


Sunday, 5 May 2013

Girls Night Out Make Up

So now I'm back home and free apart from work, I'm so excited that I get to spend more time with my girls.
As much as I love Liverpool and my uni girls, there's nothing quite like home and the people that come with it. I'd been looking forward to a return night out ever since we planned it and finding that I was off work, we were out for the Saturday night.

One of my favourite things about getting ready for a night out is doing my make up. I always find that it does take a bit of planning, like what colours will look right with what I'm wearing? If I have dark eyes can I wear a dramatic lip or will it look too much? You get the idea.

For last night's make up I wanted to use two of my new investments. I'm finding that eBay is great for buying MAC stuff. You can end up saving yourself a few quid which is a good thing in the long run. I'd bought two now shadows off eBay, Carbon and Shadowy Lady. Everyone needs a good standard black, so Carbon is perfect for creating smokey eyes or if you want a softer look liner rather than a gel or liquid liner. I bought Shadowy Lady, which is a dark plummy purple, because I thought that a lot of my shadows tend to be browns and goldy shades. Purple is a bit different and I think it's great used in the crease as a cut or to put a twist on a smokey eye if you don't want to use a black.

Anyway, here's what my eye make up for the evening looked like:

I started with MAC Ricepaper all over the lid and up to the brow bone getting right into the inner corner. I think Ricepaper is a great colour to begin any look and it can be used as a highlight as well as I have done here. On the lid I blended Casino, again by MAC, from the centre outwards. I then took Mulch and blended it along the crease about 3/4 of the way inwards. Using a 214 short shader brush, I used Shadowy Lady right in the outer corner of the crease, blending it together with the Mulch. I then added Carbon on top of this again in the outer corner. To finish, I took Amber Lights and added it to the lower lashline and reapplied Ricepaper in a small V on the inner corner of the upper and lower lashlines. I lined my upper lashline and waterline with Blacktrack before smoking out the upper lashline with Carbon. I applied mascara on my lower lashline and used Millie Mackintosh lashes in Shoreditch.

For my brows, I shaped up the bottom with my Stud pencil and pencilled in the tail end. To give my brows more of a natural fade, I used Brun eyeshadow to fill in the rest of my brow before blending using a brow brush. I then finished them off using concealer to define the shape.


On my face, I used MAC Studio Fix foundation in NW25. I usually use NC25 but I find NW matches my skin better when wearing fake tan. I applied extra foundation under my eyes to cover any bags and left it for a short time to set before using a 188 duo fibre brush so that it looks natural.

I always use two types of powder bronzers. My favourite product, possibly of all time, is my Extra Dimension Skinfinish Powder in Superb. It was a limited edition product so I will probably cry when it runs out! I use that under my cheekbones and sweep a small amount of Skinfinish Natural in Medium Deep on my temples and along my jawline. I then used the 188 brush to blend it all together. I added Hush Cream Colour Base as a highlight and then used Nars Mata Hari blush, which I LOVE.

My lips have been filled in with Beauty limited edition glaze lipstick and pencilled in using Pink Treat cream liner. I then added Impassioned lipstick on top when I actually went out.


Here is the finished make up. I think I need to invest in some Fix Plus to make sure everything stays in place because at the moment I'm just using hairspray! If I get hold of that I'll definitely review it on here. I've seen loads of palettes that I've fallen in love with with really bright zingy colours by a brand called Bitchslap Cosmetics. It's only available in America so I'd have to order it in. Don't know if I'll be able to resist the temptation so you might see them on here soon!

Sunday, 21 April 2013

New Goodies

I'm enjoying a proper lazy Sunday in bed doing very little and eating food that I shouldn't be.
In the meantime, on Friday I finished my first year at Uni, which is completely UNREAL. Seems like a second ago that I arrived and now I have 4 and a half months off to play with. Don't quite know what to do with myself!

To celebrate finishing, I decided to spoil myself with a few new make up bits. Here's what I came home with:
My usual favourite treat is anything MAC, as I've mentioned many a time. I've got a massive collection of lipsticks, but I've been after this one for ages. The shade is called Impassioned and it's an amplified lippy, which is one of my favourite finishes because it doesn't dry the lips out. The lipstick cost me £14 but I think it's worth it.

I also decided I needed to invest in a purple nail varnish, as I'd left my favourite Leighton Denny one at home. This one is called Dark Angel and it has a cream finish to it. I loveee the colour on! I don't like to wear black nail varnish, so a dark purple is a great substitute for me.

My final purchase was this NARS blusher. I've heard great things about NARS make up but I've never actually bought anything from there before. I saw this shade of blusher on a make up artist's instagram and fell in love with it. The colour is called Mata Hari and I think it's beautiful on. You only need a tiny bit to go a long way, so I'm sure this will last me ages. I love the way that there's a mirror built in to incase I need to fix up on the go.

After my exam on Friday, my flatmate's friends came to visit and we all went on a night out. I decided to take a few pictures of how my make up ended up. I used all of my new bits from earlier that day as well.
My eyes were the first thing to be done. Here I put MAC Ricepaper eyeshadow on the lid and in the inner corner before buffing Amber Lights into the outer corner. I used Casino in the centre of the lid and blended that together with Amber Lights. I also put Amber Lights under the lower lashline. I then used a small amount of the Constructivist paint pot on the crease and buffed Mulch shadow into it. I also used Hush Cream Colour Base as a highlight under the brows. I put on a thin line of Blacktrack on my upper lashline and waterline before adding lashes. The ones I'm wearing are the Millie Mackintosh lashes in Shoreditch but brand new ones.  I didn't want to go too out there with my eye make up because Impassioned is a fairly bright lipstick, so didn't want to take too much away from it.
Here is Mata Hari on the cheek. The colour is beaaauuuutiful, I'm in love with it! I used it along with my Extra Dimension Powder in Superb to contour and Hush again to highlight.
 
This is the finished look from the evening and I found that all of my make up managed to stay on really well, especially my eye make up. A good night was had by all.

Wednesday, 17 April 2013

Casino Eye Shadow Make Up Look

Sorry this has taken so long! I'm back at uni now and have so much to do but just couldn't wait any longer!
I was a bit lazy with this look I have to admit, seeing as it's currently 1am here now and I'm just off to bed. I thought I'd do it before I took my make up from the day off, so my brows and foundation were already done and I had a bit of mascara on. I'm thinking I might get one of the uni girls to be a model for me next time and go from scratch.
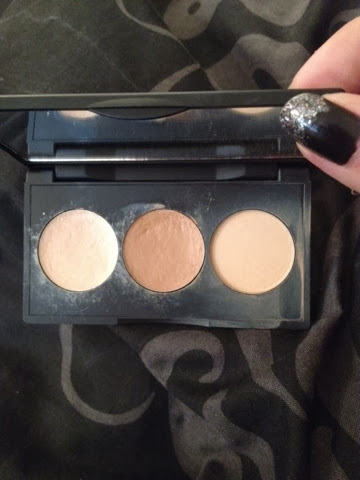
So here's what I'm working with. On the bottom on the left hand side is Casino, the shadow I bought from eBay that I talked about in my previous post. At the top is Brun, a satin brown which is perfect for a smokey look but if you aren't brave enough to go with a black. Finally we have Knight Divine on the right hand side. I got that shadow for my 16th birthday and it was the first MAC shadow I ever bought. Almost 5 years later and it's only just getting to the bottom of the pan!

Here are the tools I'll be using. This picture just makes me realise my brushes need a good clean, whoops! My favourite brush is the 213 because it can be used to deposit colour but you can start to blend as well before finishing off with the 224. The 213 I recently bought off eBay. Pretty sure that's not a real MAC brush but it doesn't bother me really. That's great for smoking out lower lashlines.
I used to use MAC lashes (typical) all the time, but recently I have a new favourite. Everyone's favourite Made In Chelsea girl Millie Mackintosh has launched her own lash line and I LOVE them. Here's a brand new pack I bought recently from nouveaubeautygroup.com but I believe you can get them in Selfridges now amongst other stockists. At £8.99, they aren't massively cheap, but less expensive than MAC at least. I love the Shoreditch lashes especially, which I'll be using in the look today. I'm saving these brand new ones for a special occasion so I'll be using my old ones, which are fine just a little bit well used.

Okay, so being lazy, I already had most of my make up on which just needed touching up. I used my MAC Studio Fix Fluid in NW25 (because I have tan on) all over my face, concentrating on covering any bags under my eyes. I filled in my brows with my Stud brow pencil and added a bit of bronzer as well. I put on mascara, which was Loreal Mega Volume Collagene 24 Hour in Extra Black, definitely a trusty mascara.

To start my eyes, I put MAC Prep +  Prime Vibrancy Eye all over the lid up to the brow. It's important to use primer before putting on eyeshadow so that it doesn't crease and you end up with that horrible line across your lid.
Next, I put Casino on my 213 brush and popped it all over my lid and right into the inner corner of my eye. I then blended it out using the 224 brush so that it filled the lid up to the crease. Blending is great because it stops shadow from looking too harsh and removes any obvious lines from using brushes. I also put Casino under my lower lashline using the 214 brush.
To follow that, I used Brun, again on the 213 brush, in the outer corner of the crease, blending it out with the 224 towards the inner corner. I also used the 214 brush to put Brun under the outer corner of the lower lashline, stopping about 3/4 of the way in.
This is what this looked like so far. I probably should've taken a picture with my eyes shut but oh well.
 Next, I used Knight Divine, but on the 239 eye shader brush, as I find this is easier to control the area you want to put shadow on over the 213. People use all of the brushes in different ways, there are no set brushes for set things, but that's the way I prefer to do it. I used Knight Divine in the outer corner of the crease then blended it outwards and upwards as well as along the crease into the Brun.
I took the Brun again but on the blending brush and just swept it once across the brow bone just to make sure that the grey didn't look too harsh.
I followed this by using my Hush Cream Colour Base to highlight my brows and to soften any harsh lines near the brow bone. I then cleaned up along the outer corner using concealer.
Using the 210 liner brush, I applied Fluidline Liner in Blacktrack along the upper lashline. I didn't flick it out or anything because I think if the eye is quite dark you don't really need it. I then did the same on the waterline.
Here is the finished look minus lashes:

On my lips I used my faaaaavourite lipstick of all time, Snob. It's bright, but wearable during the day and I don't like using reds when I've used greys or blacks on the eye. Therefore, Snob is perfect, as it's a lovely blue-toned pink.
 
Here's how it looked after the lashes were applied. I used Duo Adhesive glue and tweezers to put the lashes on for anyone wondering.

And the grand finale...
The finished look with the lashes makes the look that more dramatic. I think the use of grey rather than a black like Carbon also adds to the smoky effect I was trying to achieve. I also think that Casino acts as a brightener to the eye in the inner corner while showing the 'fading out' on the lid.
 
I hope you enjoyed the look. Maybe I'll do my step-by-step when I get ready to go out on Friday night. I think a red Ruby Woo lip might be putting in an appearance...